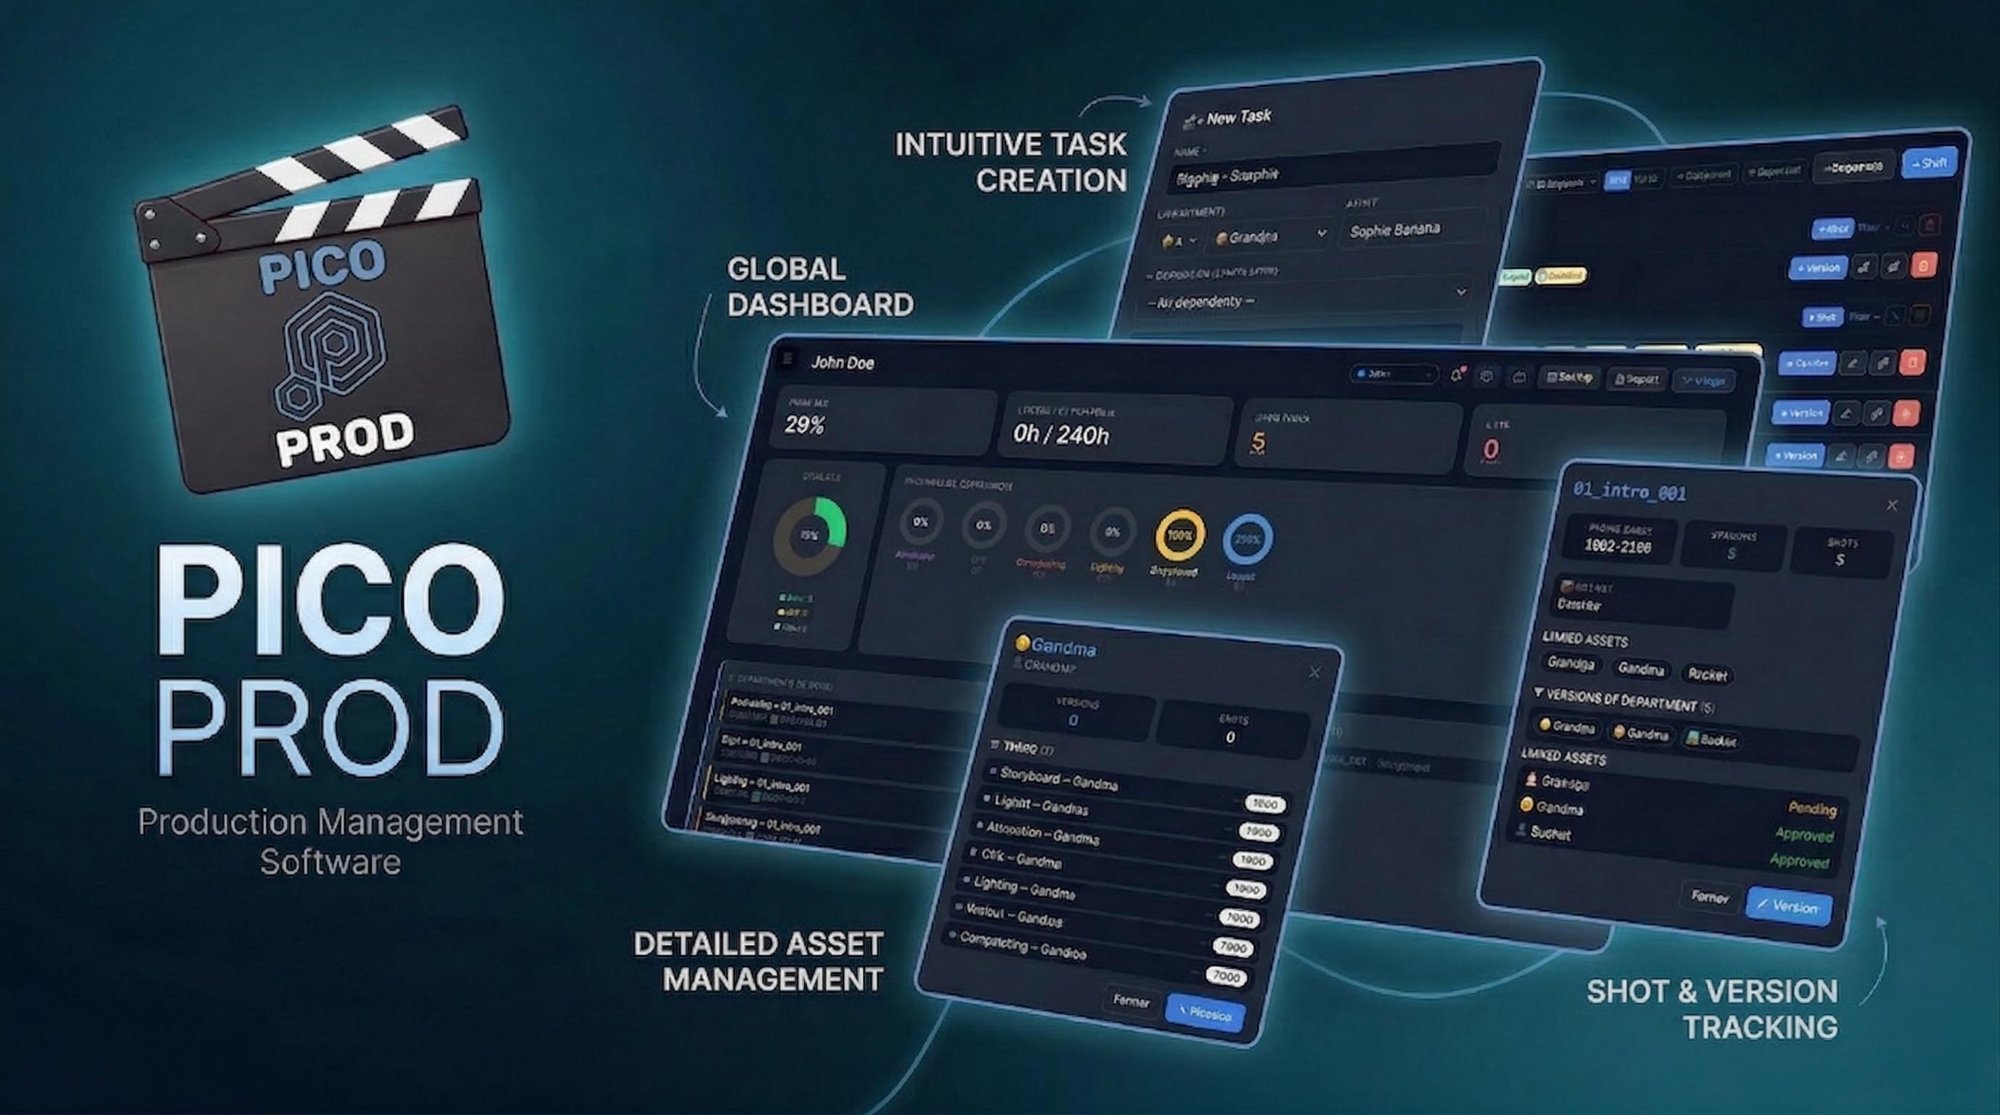
Interface & Navigation
Finding your way around Picoprod
Picoprod is organized into sections via the left sidebar. At the top of every page, the global action bar is always accessible.
Global Action Bar
| Login (first name) | Select your identity — filters the Dashboard on your tasks and signs your notes. |
| 🔔 Alerts | Overdue tasks and upcoming milestones. Red dot = active alerts. |
| ❓ Help | Back to the Picoprod home page. |
| 💾 Backup | Export a backup. With multiple projects, choose which to include. |
| 📥 Import | Same name → Replace or Merge. Different name → added automatically. |
| 🔀 Merge | Intelligently merge an external backup without overwriting your data. |
Keyboard shortcuts
Create your Project
The first thing to do
A project is the main container for your entire production. Picoprod lets you manage multiple projects simultaneously.
Ouvrir la section "Projets"
Menu latéral → Projets. Vous verrez la liste de vos projets.
Rename your project
Click the ✎ button and enter your production name.
Multi-project
You can have several projects. The top left selector lets you switch.
| Import même nom | Propose : Remplacer (irréversible) ou Merger (recommandé) |
| Import nom différent | Ajouté automatiquement sans rien écraser. Vous basculez sur le nouveau projet. |
| Login preserved | After an Import or Merge, you stay logged in with your identity. |
Build your Team
Add the project members
Each member is an artist in Picoprod. Artists are assigned to tasks and can log in via the Login selector.
Go to "Team"
Left sidebar → Team.
Click "+ Member"
First name (required), last name, role, distinctive color for the Gantt.
Log in
Global bar top right → select your first name. Dashboard switches to your personal view.
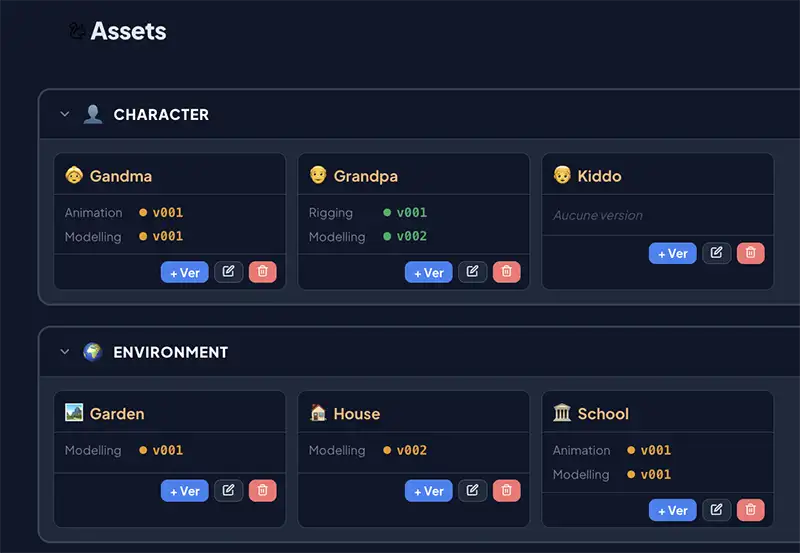
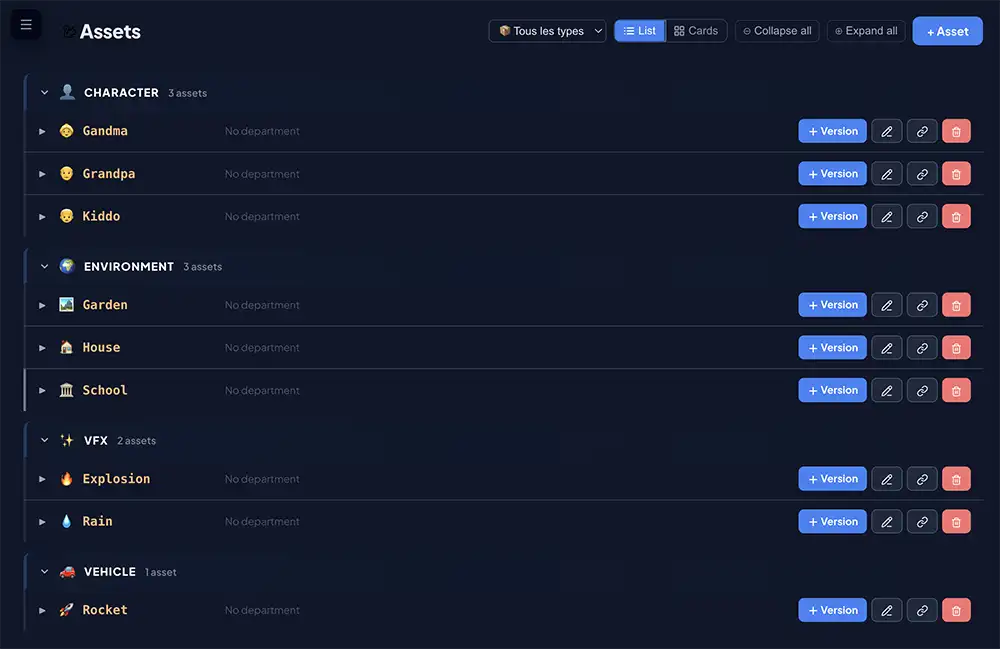
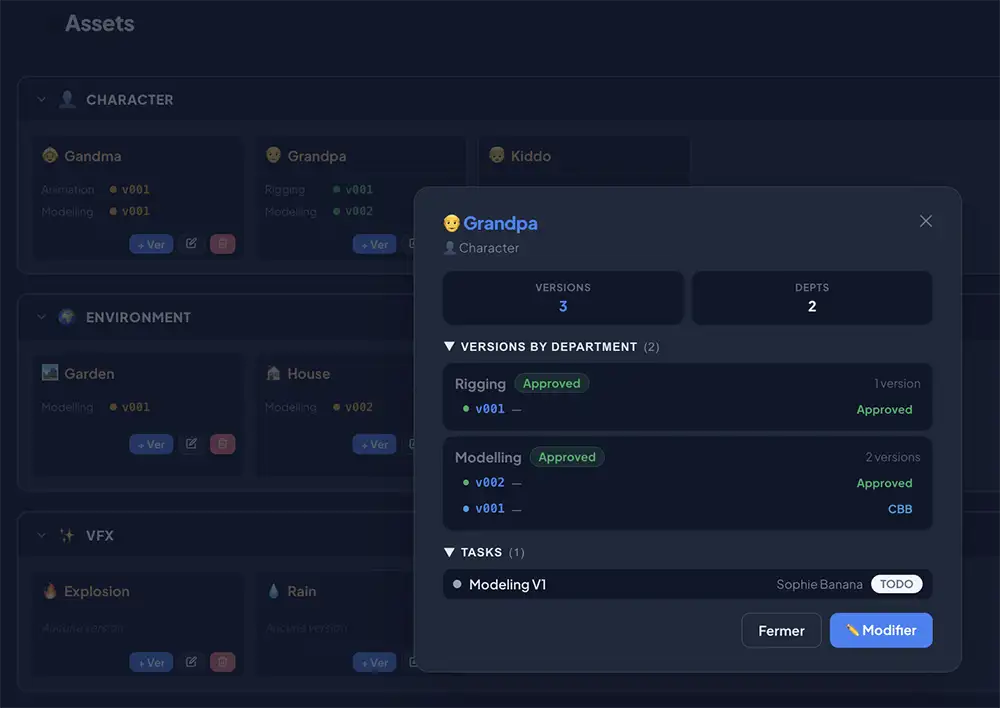
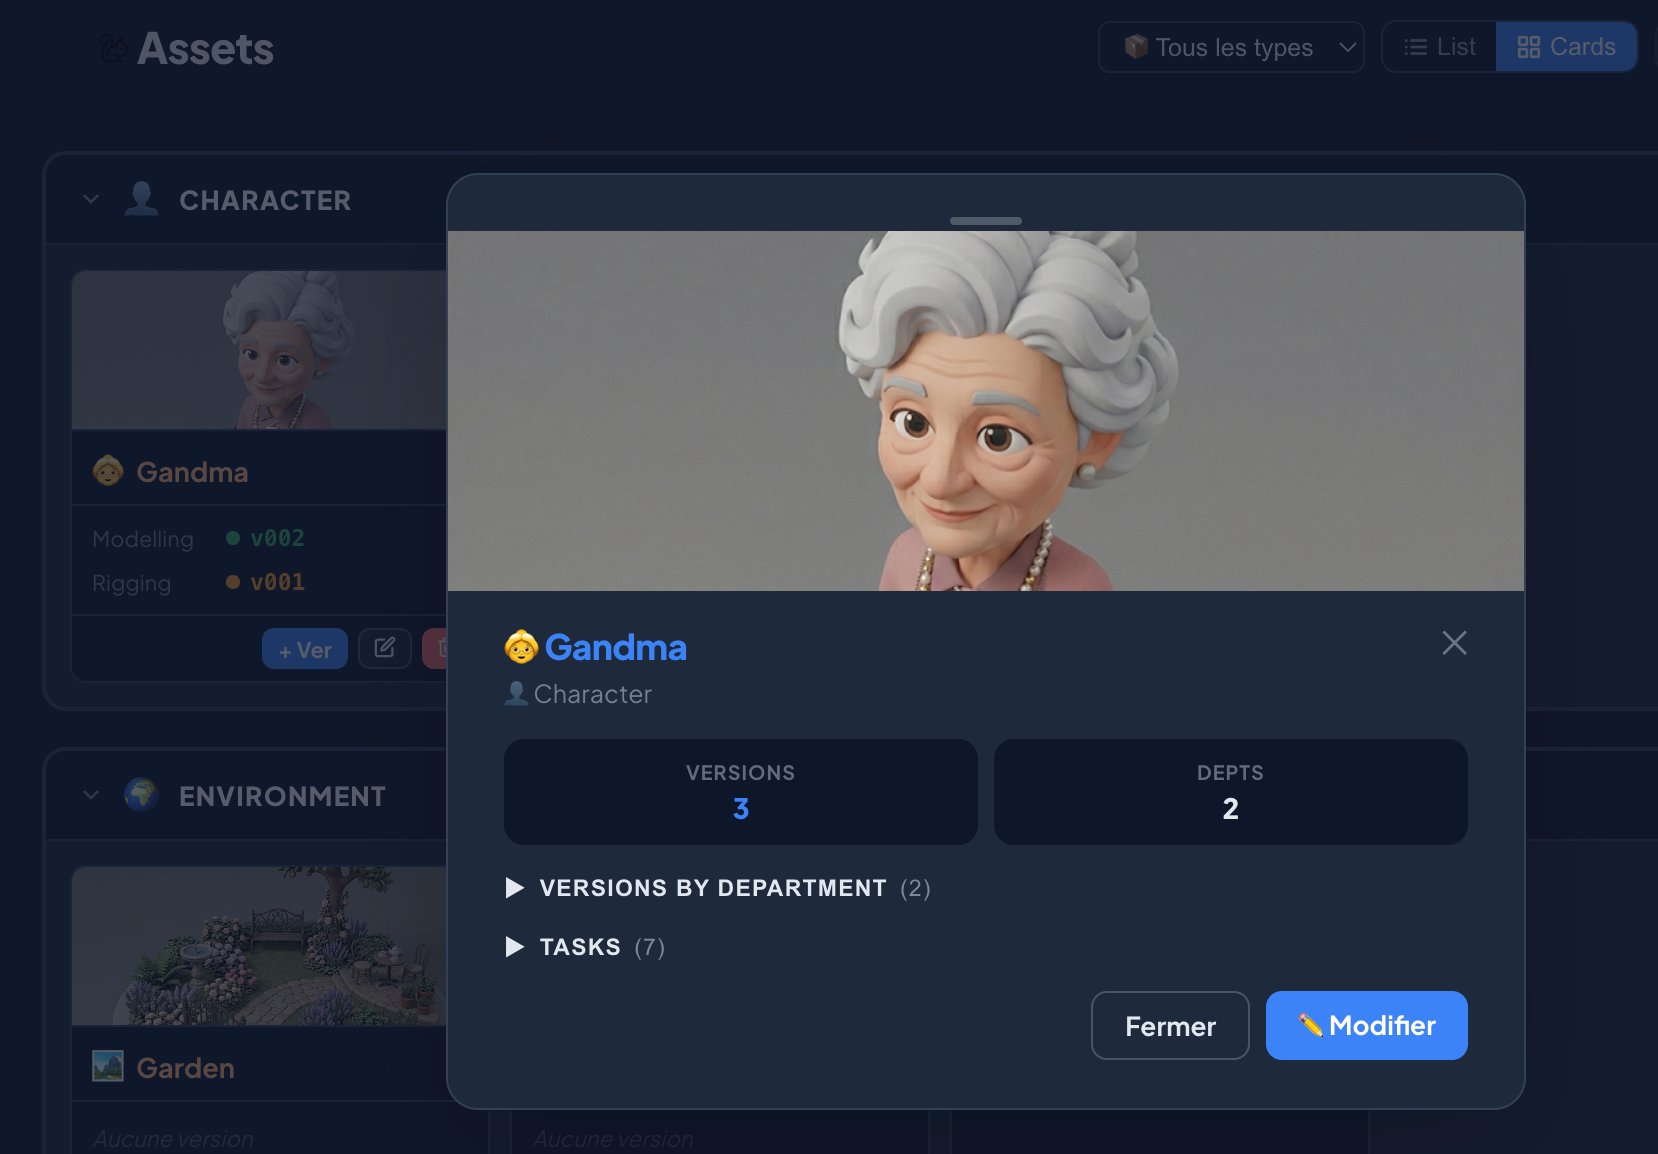
Assets & Info Panels
Characters, sets, effects...
An asset is any graphic element of your production. Custom fields (Comments, Variant, Reference...) let you enrich each card. One click opens the quick info panel — everything visible without leaving the view.
Create an asset
Assets → + Asset. Name, Type, custom emoji (Pro), detail fields.
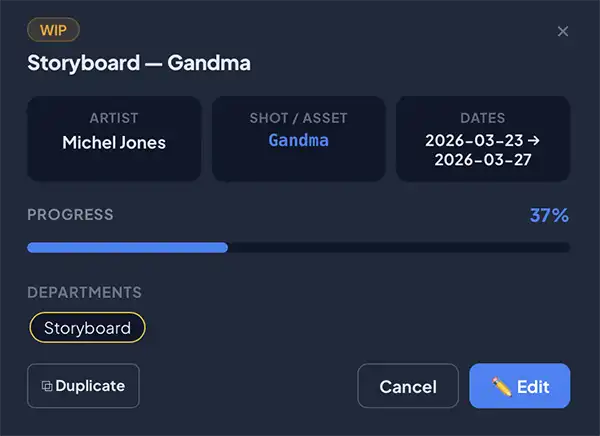
Quick info panel
Click an asset: KPIs, filled fields, versions by department (collapsible), tasks (collapsible).
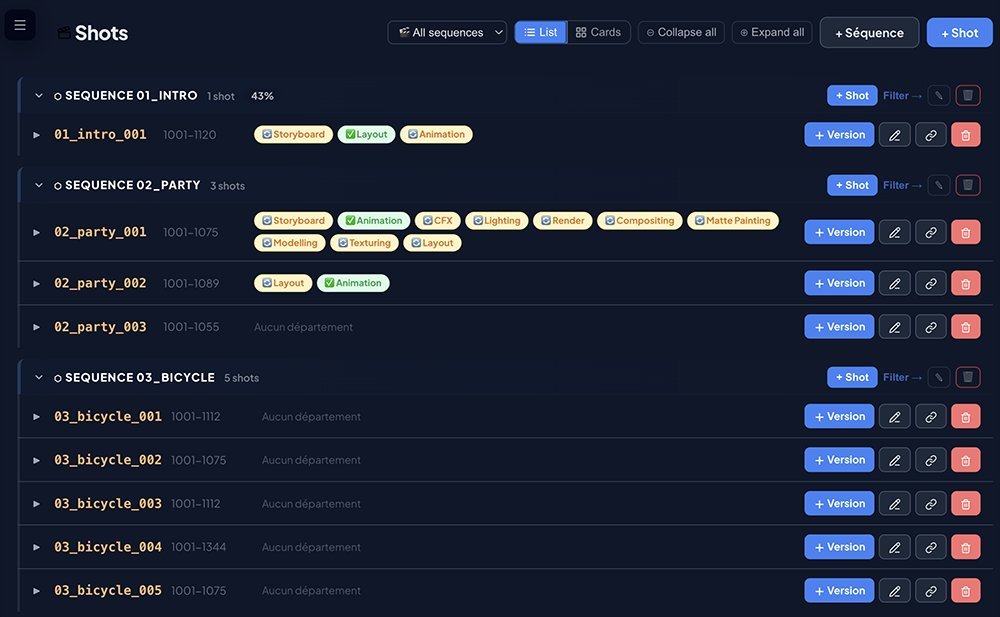
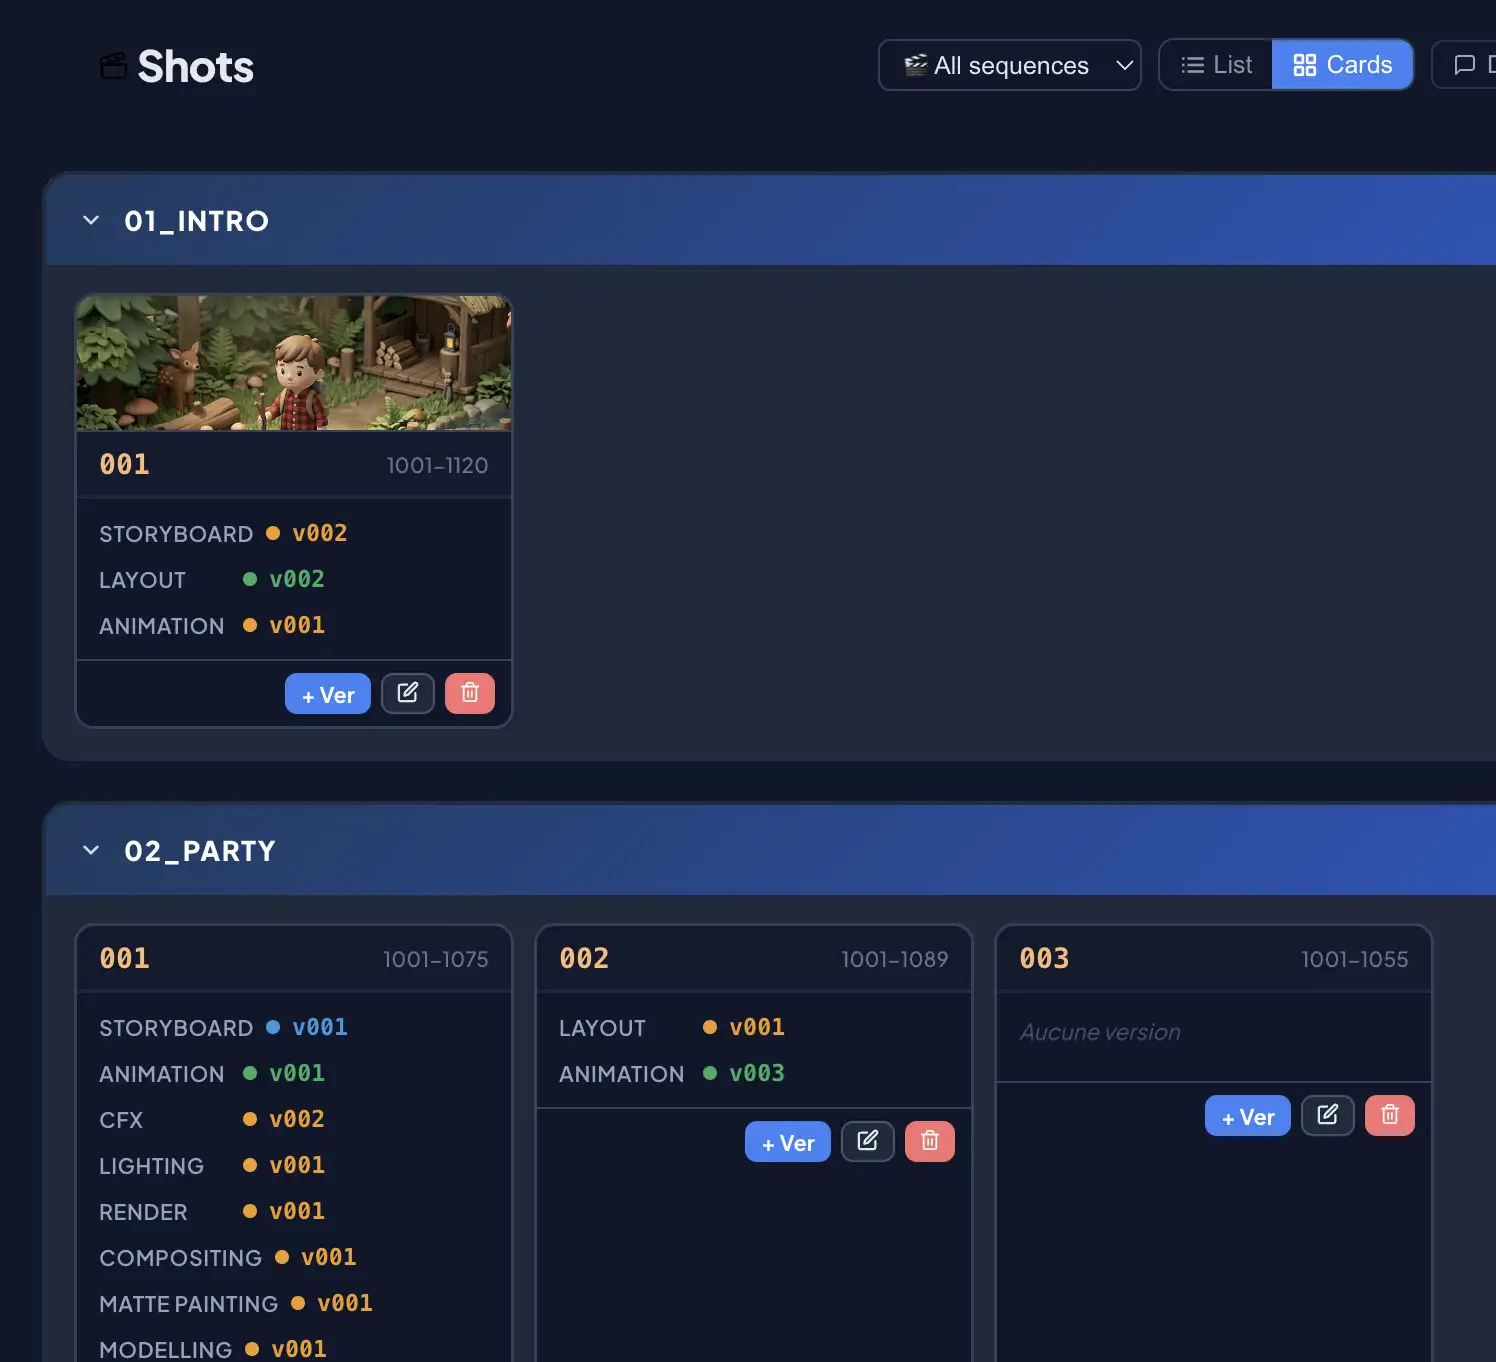
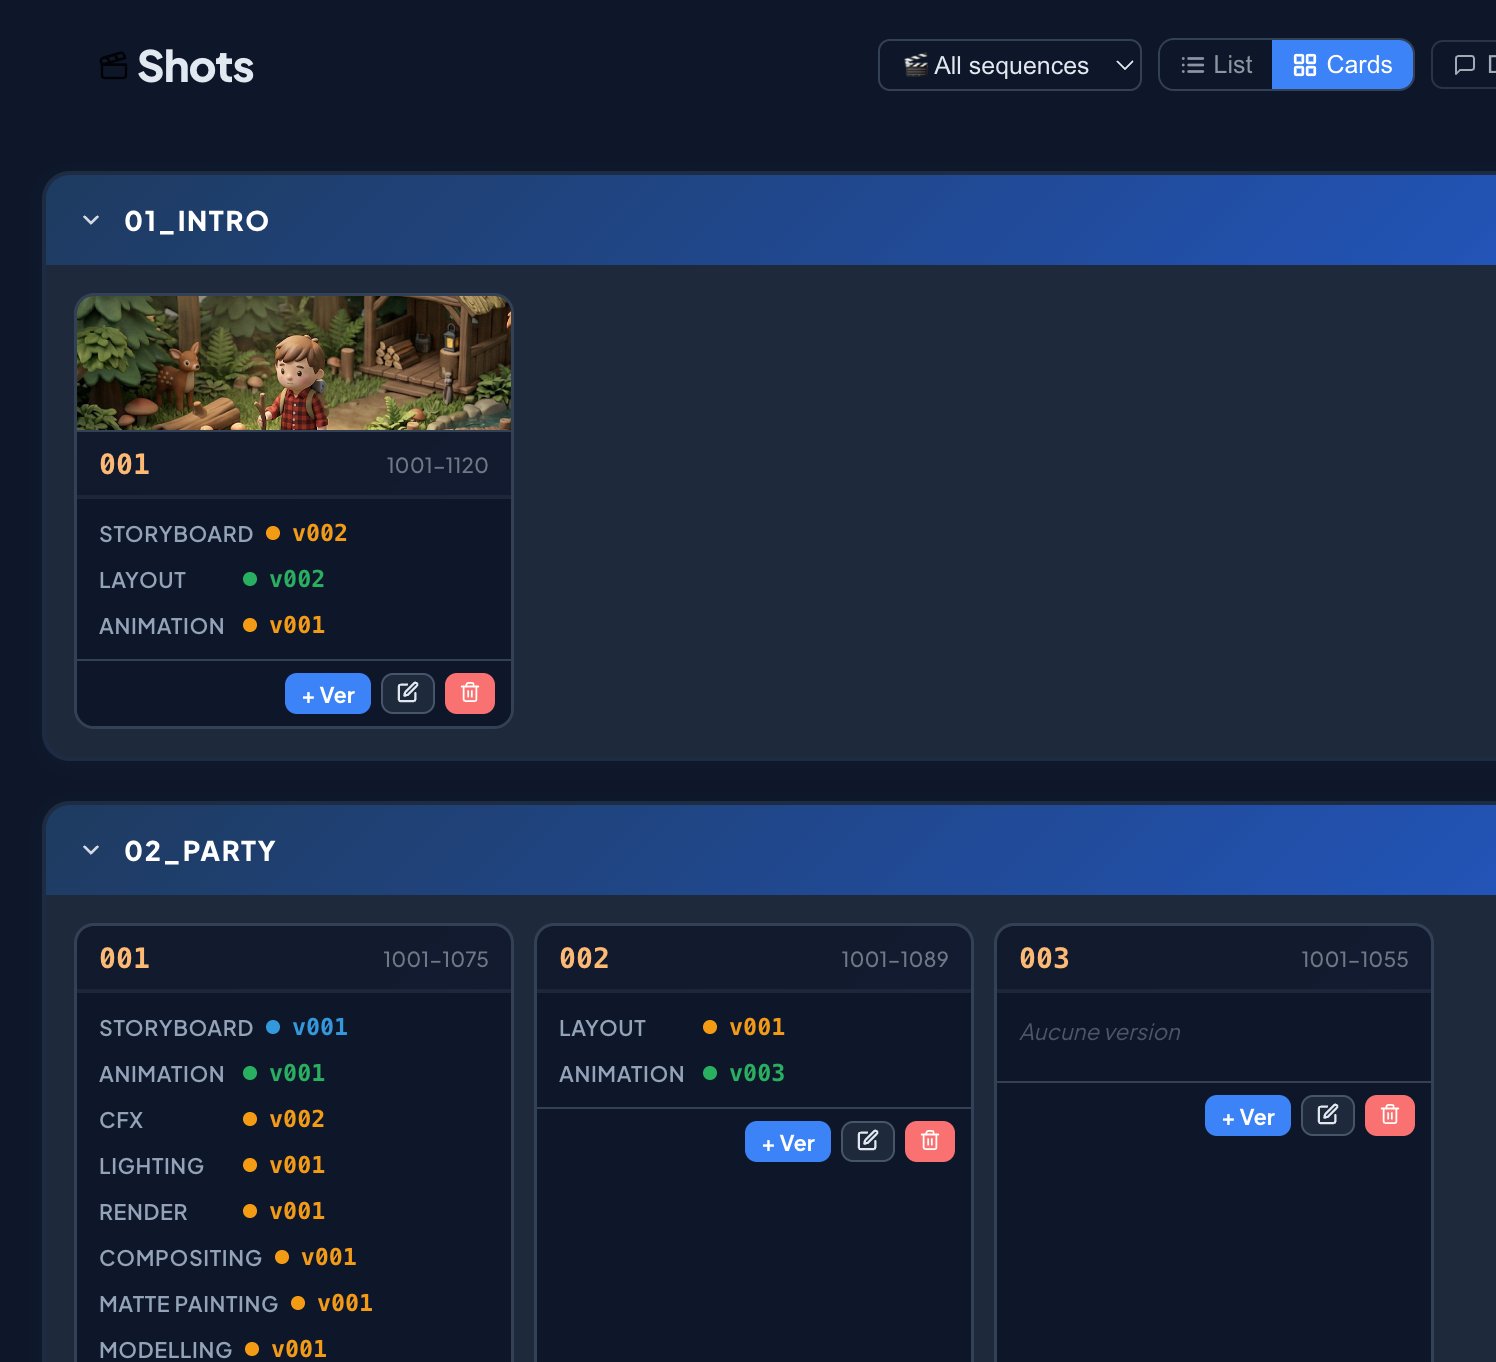
Sequences & Shots
Structure your film shot by shot
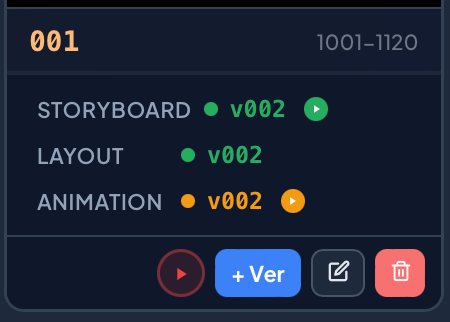
Shot ID = sequence name + underscore + number: 01_intro_010. Each sequence header shows the completion % based on linked tasks.
Create a sequence
Shots → + Sequence. Name it: "01_intro", "SQ010"...
Create shots
Click + Shot in the sequence header. Enter the number (e.g. "010").
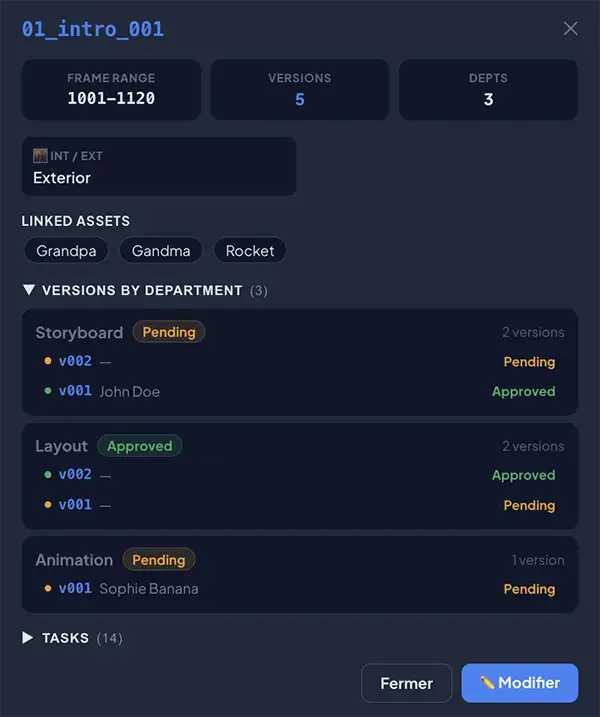
Shot info panel
Frame Range, Int/Ext, comments, linked assets, versions by department and tasks — all collapsible.
Advanced tasks
Dependencies, duplication, progress slider
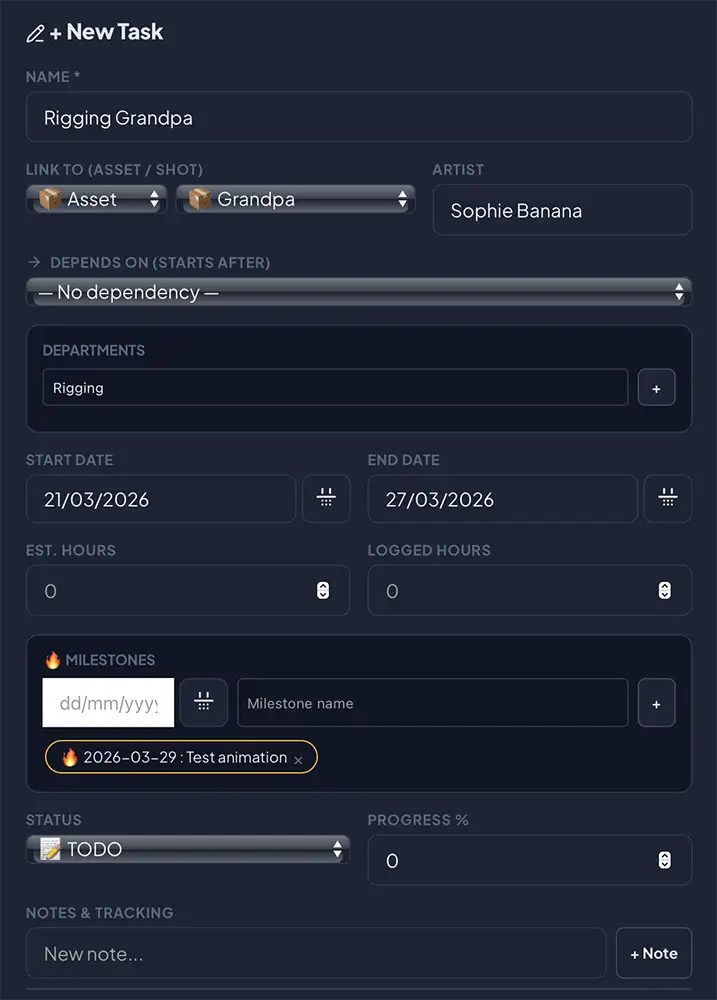
A task represents work with an assignee, dates, status and progress. Several advanced features speed up daily management.
| Link to Shot | Dedicated selector — automatically locks the Asset selector |
| Link to Asset | Dedicated selector — automatically locks the Shot selector |
| Depends on | This task starts after the other is completed |
| Milestones | Dated milestones — visible on the Gantt with hover tooltip |
| Progress slider | Update progress directly in the info panel without opening the form |
| Duplicate | Button in the info panel — creates a TODO copy with 0% progress |
| History | The info panel shows timestamped status change history |
Pipeline Templates
Create reusable task sequences
A pipeline template is a predefined sequence of steps you apply with one click to a shot or asset. Picoprod creates the tasks with the correct dates and properly resolved dependencies.
Create a template
Templates → + New template. Add your pipeline steps and duration in days.
Définir les dépendances
Pour chaque étape, "Dépend de" indique quelle étape doit être terminée avant. Ex: Lighting dépend de Animation.
Reorder by drag & drop
Drag steps by the ⠿ handle. Dependency indexes recalculate automatically.
Appliquer sur un shot ou asset
Templates → "Appliquer" → choisir Shot OU Asset → date de début → Créer les tâches.
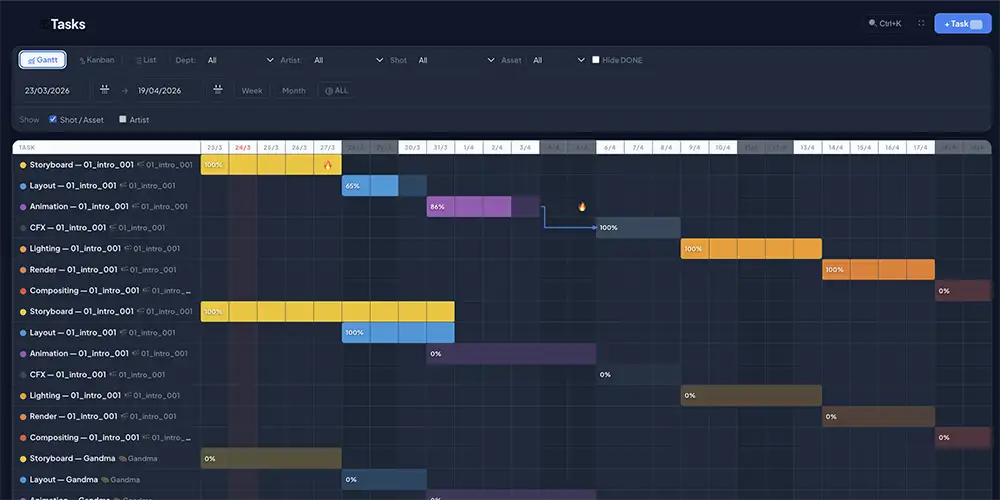
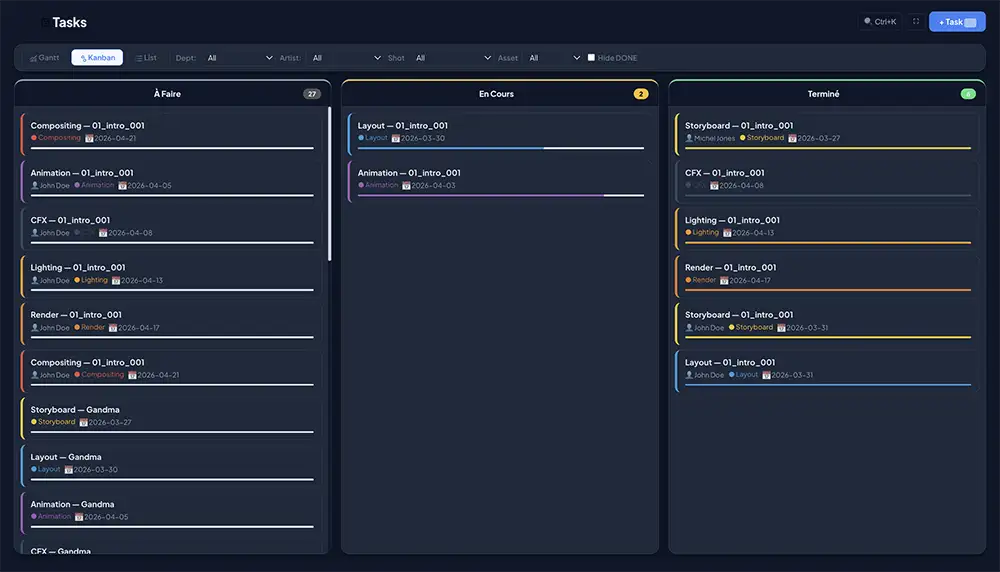
Planning Views
Gantt, Kanban, List and advanced features
Three complementary views. Switch between them with G K L.
| Vue | Idéale pour | Raccourci |
|---|---|---|
| Gantt | Calendrier, chevauchements, dépendances entre tâches | G |
| Kanban | Avancement TODO/WIP/DONE par glisser-déposer | K |
| Liste | Tableau complet : sélection multiple, batch, édition rapide double-clic | L |
Fonctionnalités avancées
| Stacked filters | Dept + Artist + Shot + Asset + Hide DONE — all combinable |
| Gantt Milestones | Icon at the milestone date. Hover to see name instantly |
| Presentation Mode | ⛶ button in topbar — hides everything except Gantt, fullscreen. Esc to exit |
| Drag a bar | Click-drag a Gantt bar to move the task — dates recalculate automatically |
| Stretch a bar | Pull the left or right edge to change the start or end date |
| Sticky column | Task name column stays visible when scrolling horizontally — resizable by drag |
| Working days | Configure your working days and off days in the Tasks section. Non-working days appear grey with dotted lines |
| Auto cascade | Enable Cascade mode (Settings) to automatically shift dependent tasks when a task is moved |
| Ctrl+K Search | Tasks, shots, assets, artists — click = direct navigation + info panel |
| Batch actions | Check multiple tasks → assign an artist or change status at once |
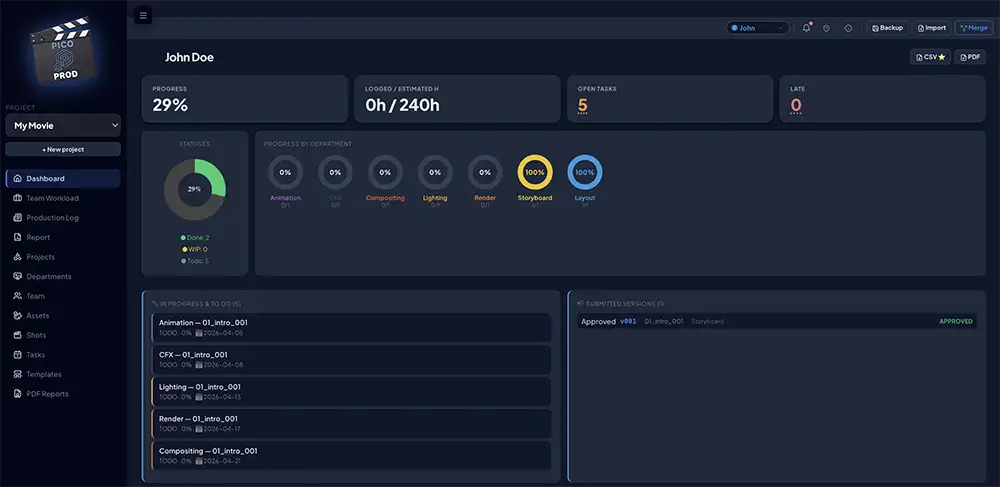
Dashboard
Manage production at a glance
The dashboard adapts to your login: general view (whole project) or artist view (your personal tasks).
Clickable KPIs
| Progress | Average % completion of all tasks |
| Open Tasks | TODO + WIP. Click → popup list sorted by deadline |
| Late | Overdue unfinished tasks. Click → red popup list sorted by age |
| Pie charts | A mini pie chart per department — dept color (DONE), amber (WIP), grey (TODO) |
Logged-in artist view
| My day | Today's active tasks + overdue, sorted by urgency |
| In progress & To do | All your unfinished tasks, sorted by deadline |
| Received messages | Log messages mentioning you, with Reply button |
| Sent messages | Your messages with mentions, and received replies |
| Submitted versions | Your latest submitted versions |
Production Messages
Communicate with @mentions in the log
The Production Log lets you publish signed notes and mention artists with @FirstName. The recipient sees the message in their dashboard.
Write a message
Tasks → Log. Type your message with @FirstName. Autocomplete activates after @.
Le destinataire voit le message
Il apparaît dans "Messages reçus" de son dashboard avec votre avatar et votre nom.
Bidirectional reply
Click Reply → the reply appears in the sender's "Sent messages" section.
| Tags | Internal (team) or Client (client feedback) — filterable in PDF exports |
| Statuses | Urgent, Question, Info, Done — visual categorization |
| PDF Log export | Exports only entries visible with active filters (e.g. Client Notes only) |
Versions & Artistic Tracking
Track progress version by version
In production, a shot goes through multiple versions: v001 (first pass), v002 (feedback integrated), v003 (approved)... Picoprod centralizes these versions per shot/asset and department.
| Statut | Signification |
|---|---|
| PENDING | En attente de review |
| CBB | Could Be Better — à améliorer |
| APPROVED | Validé — livrable |
| OMIT | Retiré / supprimé |
| RETAKE | À refaire entièrement |
Video URL on versions
Each version can have a video link (Google Drive, YouTube, Vimeo, SyncSketch...). This link is directly accessible from shot/asset cards and from the version popup.
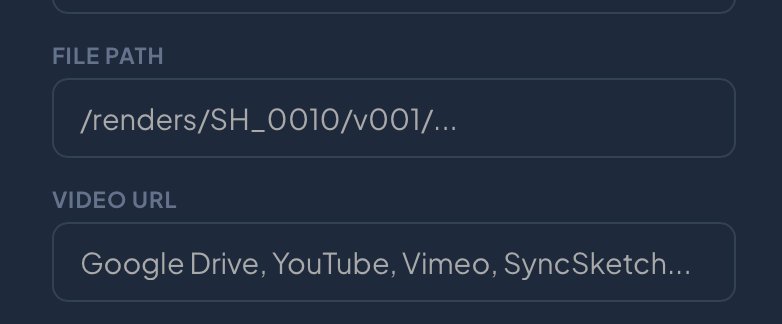
| Version form | Video URL field — accepts Google Drive, YouTube, Vimeo, SyncSketch or any URL |
| ▶ button on cards | Appears automatically when a URL is set — colour matches the version status (green Approved, orange Pending…) |
| ▶ button in list view | Shown next to the version number — direct click to video without opening the popup |
| Version popup | Blue "▶ Watch video" button if a URL is set |
| Version hover | Blue highlight on hover in card view and info panels — clearly shows the clickable element |
PDF Exports & Reports
Share progress
Picoprod generates PDF reports from the Exports & Reports section. Each report includes header with studio logo (Pro), watermark, footer with pagination.
| Rapport | Contenu | Accès |
|---|---|---|
| Dashboard PDF | KPIs, pie charts, dept bars, late/open tasks | Dashboard → PDF |
| Log PDF | Log entries — respects active filters (e.g. Client only) | Log → Export |
| Artist To-Do | Artist's WIP & TODO tasks with deadlines | Exports & Reports |
| Dailies | Versions submitted over a period with statuses | Exports & Reports |
| Shot Report | All versions of a shot by department | Exports & Reports |
| Asset Report | Complete version history of an asset | Exports & Reports |
| Health Report | Global KPIs: delays, hours, progress, all shots | Exports & Reports |
| Gantt Capture | Visual export of the schedule as PDF | Exports & Reports |
Team Collaboration — Merge
Sync multiple people
Picoprod works in single-workstation mode. To share work, use the smart Merge which merges two backups without overwriting anything.
Each artist exports their Backup
Global bar → Backup. Choose which projects to include. Send the .txt file to the manager.
The manager does a Merge
Global bar → Merge → select the file → preview differences → Confirm.
Login preserved
After any Import or Merge, you stay logged in with your identity.
Data, Backups and Limits
What you need to know
Picoprod stores all your data in your browser's localStorage — fast and private, but with some important rules.
| Where is my data? | In the browser, on your computer. Never on a server. |
| Storage limit | About 5-10 MB depending on the browser. Enough for hundreds of tasks. |
| Clear cache | Deletes ALL your Picoprod data. Always do a Backup first. |
| Switch browser | Data doesn't transfer automatically. Use Export/Import. |
| Daily backup | Export every evening. Name it: MyProject_2026-03-21.txt |
Startup Checklist
Tout ce qu'il faut faire pour bien démarrer
Thumbnails
Visualize your images directly in Picoprod
Add a reference image to each shot or asset. Picoprod only stores the URL — zero impact on the 5 MB storage limit. Images load directly from your host.
Host the image
Google Drive, Dropbox or GitHub. On Drive: right-click → Share → "Anyone with the link".
Copy the share link
Paste as-is (e.g. https://drive.google.com/file/d/ABC.../view). Picoprod converts it automatically.
Paste into the form
Edit a shot or asset → Thumbnail URL field → paste → preview appears immediately.
| Card view | Thumbnail at top of card (80px) |
| List view | 40×28px thumbnail left of name |
| Info panel | Full-width under drag handle — click for lightbox |
| Google Drive | Share link auto-converted to image URL |
| Dropbox | ?dl=0 → ?raw=1 automatic |
| GitHub | /blob/ → raw URL automatic |
Tips & Best Practices
Go faster every day
👤 Login = Personal view
Select your first name top right. Dashboard switches to your tasks, notes are signed. "General view" to see the whole project.
🔍 Global search Ctrl+K
Find tasks, shots, assets and artists instantly. One click navigates directly and opens the info panel.
🖱 Progress slider
In a task's info panel, drag the slider to update % without opening the full form.
⧉ Duplicate a task
Info panel → Duplicate button. Creates a TODO copy with 0% progress. Useful for similar tasks.
📊 Department pie charts
A glance at the dashboard shows DONE / WIP / TODO per department. Perfect for the morning stand-up.
⛶ Presentation Mode
Button in the Planning topbar. Hides everything except Gantt, fullscreen. Perfect for client meetings. Esc to exit.
📐 Interactive Gantt
Drag a Gantt bar to move a task, pull its edges to stretch it. Dependency arrows recalculate in real time when resizing the task name column.
🗂 Pipeline templates
Create your templates once with dependencies and apply with one click. Automatic naming + cascaded dates.
📨 @mentions and messages
Mention @FirstName → they receive it in their dashboard. They reply, you see the reply in your sent messages.
📄 Filtered log PDF
Filter the log to "Client Notes" then export — you get a PDF with only client feedback, no internal notes.
💾 Save every evening
Picoprod stores in localStorage. Clear the cache = total loss. Name your backups with the date.
🎬 Shot naming
Number by tens (010, 020...) to insert forgotten shots without renumbering. The last underscore separates the sequence from the number.
💰 Pro Budget
Set day/hour rates per artist and department. Costs are calculated automatically from estimated and logged hours. Exportable to PDF, CSV and a separate backup.
📐 Interactive Gantt
Drag bars to move tasks, pull edges to resize. The task name column is resizable and stays sticky. Dependency arrows recalculate in real time.
🌍 3 Languages
French, English, Spanish — change in Settings → Language.
Production Budget ⭐ Pro
Track planned and actual costs by artist and department
The Budget section lets you set daily or hourly rates per artist and department, and automatically calculates planned and actual costs based on estimated and logged hours in your tasks.
Open the Budget section
Click Budget in the sidebar. The section is visible to all, but entering rates requires a Pro licence.
Set the global budget
Enter the total production budget envelope in the Total Budget field at the top. Set to 0 to hide the gauge.
Add rates by artist
Select an artist, choose the unit (day or hour) and enter the rate. Currency ($ € £ CAD$) is configurable. Artist rates take priority over department rates.
Add rates by department
Used automatically for tasks without an assigned artist. Allows budgeting even before assigning team members.
Rate priority
| Priority 1 | Artist rate — if the task has an assigned artist AND a rate exists for that artist |
| Priority 2 | Department rate — if the task has no artist, or the artist has no defined rate |
| No rate | Cost = 0, row shown as unvalued (—) |
Interactive charts
The Budget section displays 3 real-time charts:
| 🍩 Donut | Planned budget breakdown by department, using each department's colour |
| 📊 Bars | Planned vs Actual by department — left bar (planned), right bar (actual, darker). Green outline if under budget, red if over. |
| 🎯 Gauge | Global budget consumption as % — turns red if exceeded. Marker dot for actual spend. |
Export & backup
| Backup | Exports rates to a separate .txt file — budget data is kept confidential from the project backup |
| Import | Replaces the current project's rates from a budget backup |
| Merge | Merges by adding only missing rates, without overwriting existing ones |
| CSV | Exports the budget table (artists/depts, hours, costs) as a spreadsheet |
| Professional report with studio header, KPIs, donut + bar charts, detailed table |